New Flooring Anyone?

image10

Once the door panels were finished, the next project I tackled was the flooring.  Since Lucy is a Vanagon GL she was designed to be a passenger van with two bench seats; one in the middle and one in the back. When the previous owners used her as a parts hauling van the middle seat was removed along with chunks of the carpet underneath.

The removal of the old carpet was easy due to the amount of it that was missing.  Underneath the carpeting was cork squares for insulation/sound dampening. Those were all in good condition so they were left in.  I wanted to put in something that I could clean easily and remove fairly easy incase I ever needed to replace the cork insulation underneath.  I chose to use the click together laminate flooring.

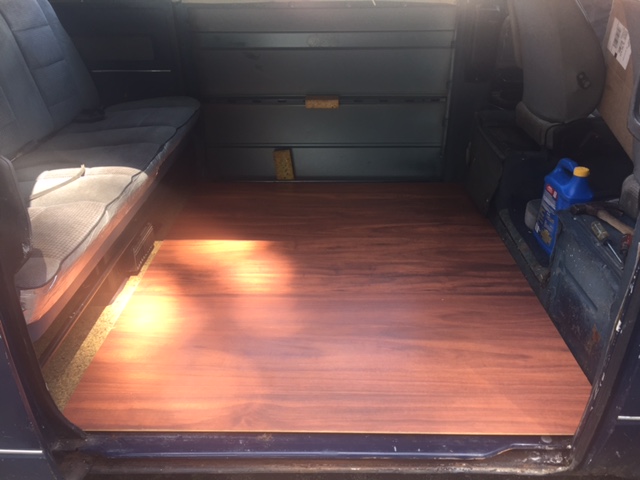
I picked this up at Home Depot on sale for around $15 for 20 sq. ft. The cool thing about this flooring is that it is easy to install/remove, clean and comes in a great variety of colors.  The color I chose was light cherry.  When I put the flooring together it fit almost perfectly.  With a few edges trimmed the new floor was installed. I definitely think that it looks better than the old worn out carpeting.  It gives it more of a “home” feeling.

Handmade Door Panels

With over 30 years of wear and tear the van was nowhere near perfect.  The previous owners were mechanics and had used it as a parts hauling van.  The middle seat had been taken out for extra storage space. The carpet on the floor was ripped up and all full of dirt, grease and who knows what.  Most of the door panels had rips in the vinyl, moderate water damage and the ash trays were filled with cigarette butts.

I had a few ideas of how I wanted to fix up the inside that I had found on Instagram and by surfing the web.  The removal of the old door panels was quite easy.  About 50 percent of the fasteners were either loose, missing or broken.  Once they were removed I used the old panels as a template for the new ones.

For the new panels I purchased 2 4×8 sheets of 1/4 inch plywood from Home Depot.  Once the panel templates were traced I cut them using a jig saw as close to the lines as possible.  With a palm sander I smoothed out the edges and straightened out the cuts.

With new panel fasteners on the way, new holes were drilled to match the old fastener holes. Before I hung the new panels I used a natural finish stain to bring out the grain of the wood and sealed/water proofed them with a marine spar varnish.


Fuel Line Replacement

After discovering Lucy had a fuel leak I purchased the GoWesty Fuel Line Replacement Kit.  The lines I replaced were located between the fuel injectors, fuel distributer rails, and the fuel distributer lines running from the T-connection to the pressure regulator.  Most of the metal hose fittings holding the hoses to their prospective homes were very badly corroded.

Remember it’s very important to keep track of all parts (old and new) and it is equally important to mark, label and photograph before you start in on your rebuild.  Below I am going to include the links to the kit used to replace my lines and the instructions that I used to complete the project.  The kit does not come with directions.  Click the vanagon.org link then search fuel line replacement.

GoWesty

Vanagon.org


The “Perfect” Van

Ever since I was young I have always wanted a VW Bus;  the quintessential hippie travel van. I dreamed of traveling the great wide open, through vast hills, valleys, and mountain ranges in search of nature and adventure.   In May of 2016 I purchased a 1985 Volkswagen Vanagon.

Although it was not the perfect VW van I had always wanted, I could see the potential that was hiding beneath its worn, 30+ year old shell.  The following couple months were spent doing basic tune up maintenance. This included new tires, an oil and filter change, new spark plugs and plug wires, a new distributer cap, a new air filter and a check of all fluids and belts.

When I completed the basic tune up maintenance the van was running well but it was not running “great”.  It was still idling at a higher RPM.  With a lot of trial and error (and help from a local mechanic) I was able to diagnose the problem. I had a fuel leak…it turned out that the hoses connected to the fuel injectors were cracked.  Along with fuel leaking from the cracks, air was being sucked through causing an inconsistent idle.

After some research I ordered the engine fuel line replacement kit from GoWesty.com.  The kit has the supplies you need to replace the feed/return lines between the fuel tank, the engine, and the fuel injector seals. Once the fuel injectors were removed and cleaned I  replaced the old worn lines and seals with the new ones. Just like that, the engine was at a consistent idle.